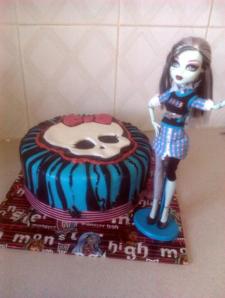
My eldest daughter is having a disco party at the local RSL club tomorrow, and her request this year was for a “Monster High” themed cake. I knew that fondant would probably pull off the look we wanted to achieve, but I had NO experience with it what.so.ever!
So, I decided to dive right in. I went halves in some supplies with my sister, as she will be making a cake in similar colours in a few weeks, and I set off on my fondant adventure. Please excuse the mobile phone pics…the camera seems to have gone walkabout!
I first baked 2 choc/rainbow cakes, using the same process that I outlined in a previous post.

Once the 2 cakes were baked, I chilled them, and trimmed the tops so they were relatively flat, then stacked them on top of each other, on the cake board, with a layer of buttercream frosting between them. I then coated the outside of the cake with the frosting, being careful to create an even coverage, and smooth surface.

While the cake chilled, I coloured my fondant.


I took a moment to print a template for the top of the cake.

When ready to cover the cake, I rolled out the blue fondant to form a large circle, big enough to cover the top and sides of the cake. I used the rolling pin to then lift it onto the cake gently. Sadly, I wasn’t gentle enough and there were some tears….ooops! I had to patch these up as best as I could, but they are still visible on the finished cake. I smoothed the surface with a smoother I purchased at the catering shop. I rolled out half the black, cut some strips with my pizza cutter, and used water to stick them on. I then put some ribbon around the base of the cake to hide the dodgy bottom edge 😉 I also drizzled some black writing icing down the sides.

Next I rolled the rest of the black, and cut around the template. I stuck this piece to the top of the cake with water. Then I cut out the next section of the template.

I stuck this on top of the black background, before cutting out the last piece at putting it on the cake.

I went around the edge of the scull with pink writing icing.

The finishing touch is one of my daughters dolls placed next to the cake.

Overall, I am totally thrilled with the results, especially considering this was my first time working with fondant.
One VERY useful tip I received from a cake decorator acquaintance, was to keep the cake in a plastic container with some Hippo moisture absorber to keep the fondant from sweating.


